I had just such a project when designing a home-page for a hospital site. A large percentage of visitors to the site have old computers and slow dial-up connections. A typical user is a middle-aged woman searching for health information for either her parents or children, and usually using a modem. We did not want slow page load time to discourage these visitors from getting the information they came for. Our goal was to get the load time for the home page to under 10 seconds. The problem was, the home page is content-heavy and features a large photo of hospital volunteers welcoming you into the hospital atrium.
Ads by Google
Posted by ellen at May 18, 2003 12:19 PM The photo :
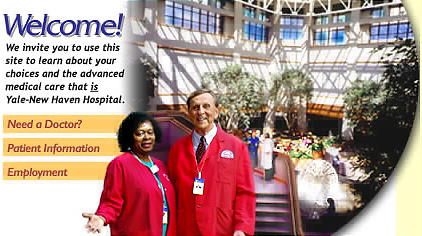
(Click on image to see it at full size)
has a lot of detail, and includes text composited into the image. The figures in the photo are small enough so that any JPEG artifacts (noise created by the compression process) will cut right through key features, like the eyes or mouth. An additional consideration is that the photo was shot in low resolution on a digital camera and composited with the atrium shot, so the image has already lost a bit of detail through processing. The uncompressed Photoshop image is 292K - at roughly 4.0K/sec (a charitable estimate on the usual 56K line) it would take 73 seconds to download the image, let alone the rest of the page.
However, in our initial attempt at compressing it down to a size that would download quickly, we found that we were losing detail and clarity in the text and the faces. In order to maximize compression AND image quality, we turned to selective JPEG compression. Analyze the problem areas JPEG compression is the preferred format over gif for photos, particularly where there are blended shadows, or color gradients, because it is not limited to a 256 color palette so will not band (as much) or dither, and often produces a much higher compression ratio.
However, since it is a "lossy" process, at higher compression levels the image will begin to degrade. Subtle values are likely to be replaced by chunks of color, and detail will be lost. "Artifacts of compression " become more noticable, and will create unpleasant changes in your image.
In order to get the highest level of compression possible, with the least amount of damage to critical areas of the image, it is necessary to selectively compress different regions at different settings.
To begin the process you will need to analyze your image for the areas most likely to degrade under high levels of compression. With JPEG compression, this is usually around the edges of things, where colors and values contrast. The border of a dark shape on a light background, the edge of text, and subtle changes in value will usually suffer the most.


quality=100 quality=10A quick way to spot problem areas is to make a test jpeg using the most extreme quality setting. A comparison of the maximum quality=100 vs. the minimum, quality=10 shown above demonstrates the loss of quality in the text, the shadow area, and the face of the woman. The image is slightly enlarged to show the transformation better.
In the next side by side comparison, the quality differential is somewhat less (quality=100 vs. quality=27), but the woman's face is still unacceptably soft and blurry in the low quality version, enough to cause an unwanted change in her expression. The text has more noise around it, and the shadow area is lumpy looking. With images of this size, so few pixels are used to actually define the details that we don't have extra pixels to spare, so we can't afford changes like this.
 (Click on image to see it at full size)
In the next test, 4 settings are compared side by side, at actual size. Based on these it appears that the text and face quality setting should fall somewhere between 100 and 30 - probably a "medium or high " setting, but the background atrium area can undergo very extreme compression without ill effect.
(Click on image to see it at full size)
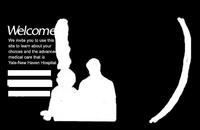
Create a Compression Mask
Based on the test image, choose areas to hold out from the highest compression settings. In this case the text, the faces, the shadows, and the edges of the figures were selected. Create an alpha channel or mask where the areas that are to be LESS compressed are white, and the areas that can be MORE compressed are black.
(Click on image to see it at full size)
The mask used for the hospital image is shown above.
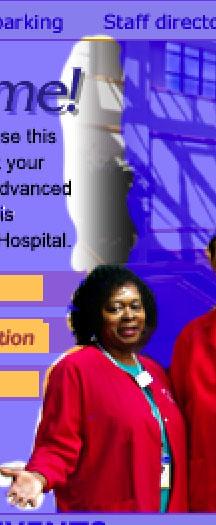
(Click on image to see it at full size)
A composite of the mask and the image are shown above, to make it clear what areas were protected from high compression. As you can see, the woman's shape is outlined a few pixels outside her actual edge. This is to prevent the gray "pixel spread" that sometimes occurs around high-contrast edges at the boundaries of compression areas.
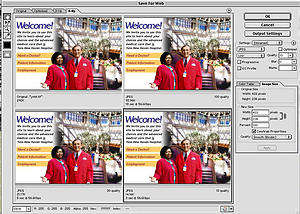
Once an alpha channel is created, select File: Save for Web. If you only want to apply this special compression to a single slice, be sure to select that slice before proceeding.
Use the Compression Mask to Control the Quality Settings
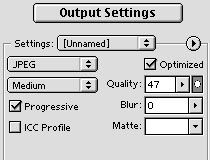
In the Output Settings area of the Save for Web window, select JPEG medium. To apply the mask, click the Mask button: the one with an oval in it, to the right of the Quality box.
(Click on image to see it at full size)
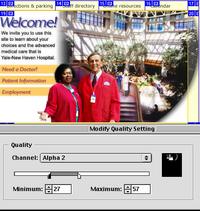
This brings up the Modify Quality Setting dialog. Move the Maximum slider to the lowest level where the quality-sensitive areas of the image look good. Move the minimum slider to a level where the rest of the image is still acceptable. Save the image.
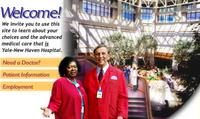
(Click on image to see it at full size)
The resulting final image is shown here. It weighs in at 27K, still a little large for our 10 second total load-time goal. The remaining time saving was achieved by splitting the page into two separate tables, side by side, using align="left" to force them to stick next to each other. This caused the left side, containing the nav bar, to display first, so that people with short patience could start clicking without waiting for the heftier content section to load.

Bless. This was sush a good tutorial in 2003 but not now. The compression techniques on the image are very sound and still valid in 2011 however you need live text for the search engines to read and index your site. Table layout mark up is much larger than css layout especially if you have more than one page. Plenty of resources out there to show you how.
Please keep this tutorial live though as it does show how far we have progressed in web development and lets not forget there is a significant portion of Africa still without broadband so low page sizes are still relevant today.
Not found in PhotoShop cs4 "Compression Mask to Control the Quality Settings" :(((
True, they removed it.
See forum post about this:
http://forums.adobe.com/message/2564551
However the function still exists in Fireworks CS5 (I just checked it).
http://adobe.ly/yehiI
or
Tutorial on Selective JPEG Compression in Fireworks
http://help.adobe.com/en_US/Fireworks/10.0_Using/WS4c25cfbb1410b0021e63e3d1152b00d6af-7fe4.html